Thursday, 20 February 2014

(✎) (✉) Vector Art Pen Assignment


The purpose of this assignment is to develop our skills on the “Pen Tool” in Adobe Illustrator. Our goal is to create a realistic object by using a real photograph as a reference. 


 The original Image and Supporting Image:


Vectored Results:


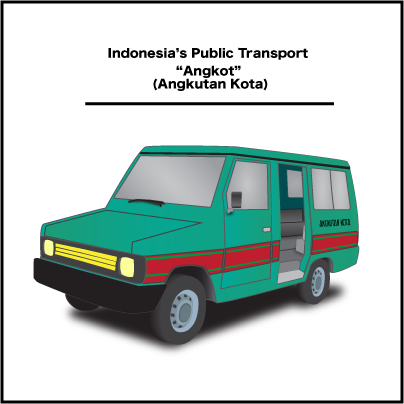
*Angkutan Kota means City Transportation
For more infos about Indonesia's Public Transport click here


      The images that shown above are vector graphics. But I saved them as .png formats. I saved them as .png formats, because based on this website and this website that I read, the format .png is more stable for the web, it has more colours compared to the others, it could remove jagged edges with the Anti-Aliasing option and it produces better quality rasterized images.

     The procedure about how I created this artwork is first of all I went to a website which is Google, and I searched for the images that I wanted. By the way, the first object that I chose was a traditional instrument. But I decided to cancel it, because the instrument is kinda small. So I decided to choose a car as my object. Anyway, then, I opened Adobe Illustrator and create a document with the option of 400 x 400 pixel and RGB colour mode, I opened the picture and resize it with the “Selection Tool”, and then I started to create the shapes for the car such as the body, the bumper, wheels, windows, and the doors. But, before I began creating things, the first thing that I had to do is create the layers. Because they will help keep the document organized and easy to modify. After that, I created the shapes of them on their layers by using the “Pen Tool”. The techniques were beginning by placing the anchor points on the paths that I wanted. For example, let's say I want to create the shape of its body. So first of all, all I need is to go to its layer and create the path, which is by following the body's shape and place the points around it and remember don't place to much points or you will end up having a complicated and an odd result. After I did that, then I filled the paths with colours and strokes which is by going to the bottom left sidebar and pick the colours. For the wheels, to get the 3D effects, all I need was just use the "Blend Tool", The procedure was first of all I created the shape of the wheel and duplicated it by going to Edit->Copy and pasted it behind the first shape. After that, gave them colours, but the first shape must have a brighter colour than the second shape because it will help them to have a realistic light values. After that select both of them and click the "Blend Tool" (it is on the left sidebar) and bum! The shapes will join together and it will create the effect. For the interior, it was the hardest part for me, because I couldn't get the perspective of it but at last I got it. How I created it?.. Basically, all I did were just the same things, but to get the effect, I used the colours value to help it look 3D. For example, if see you see clearly, the outer part is more brighter than the inside because if I used the same value it will look flat and won't have the effect and also, if you notice there is a line in front of the seat that helps lead your eyes to go inside. For the other parts/shapes, all I did were just the same thing because the purpose of this assignment is only to learn more about the "Pen Tool". But for the last step, I tweaked everything, organized the layers, and created some shadows for some parts. By the way, I created the shadows by using the "Pen Tool" too. I created the shadows by creating random shapes first and apply the blur effect to them, because the effect would help them look like real shadows, I applied the by effect by went to Effect->Blur->Gaussian Blur... and I just played with the Pop Up-Menu.

      The challenges that came across my way was the perspective illusions. It was so hard to understand the perspective because I had to deal with a lot of things like creating the details, matching the colours, etc. The hardest parts were the interior and the rims. Like what I said before, I couldn't figured out how I would be able to create the illusions for the interior and the 3D effects for the rims since they are 2D shapes, but at last I figured it out which is by playing with the hue values, opacity and create some shadows.

     I am pleased with my result because I have never done any of this project for a long time and this is also my first time I created a vector graphics using a perspective illusions. I learned a lot of things from this project, I wish I could do more.

Friday, 7 February 2014

(✎) (✉) Pixel Portrait Assignment


Hello.Welcome Back, to our new assigment. This assignment is about a Pixel Portrait. The purpose of this is to create a Pixel Portrait of ourselves, so check it out. 


        Hey, Those two are the same, don't they? Well, if you try to enlarge it, you will see the difference. The left one is on a .gif format and the other one is on a .png format. What is the difference? So, basically GIF stands for Graphics Interchange Format. It is a bitmap/raster image format. So far from what I've known,  .gif format is usually used by people to create animations but for 'still image' i don't know yet. For PNG, it stands for Portable Network Graphics. It is also a raster image format. So far, I found .png format is more better than others, it often produces better quality images. But in this case, both format for me.... first of all they look the same. So far from what I've seen, the quality of the .png (in this case) is much better than the .gif. The .png is much more smoother and the colours look more balanced and contrasted. The .gif, for overall, it almost has the same quality as .png format, but it just loses some values and colours (some of the parts are kinda dark a bit, like the hair and the details). Anyway, The features and characteristics that I was attempting to accentuate is my looks. The first feature that I found interesting is my sweater. Because, i don't know why but so far everytime I go outside, I usually wear my sweater and my jacket. I rarely wear only a shirt. The second feature is my glasses. I always wear my glasses everyday. The colours that I chose for this artwork are all based on the actual colours. Like the sweater. jacket, glasses, and my shirt (inside).
         How I created those?....hmm.. First of all, I opened Photoshop, create a new document with the options of 100 x 150 pixels, RGB colours, white background, and 72 resolution. And then, I searched for some photos of myself on my computer and find a good one. Then, I opened it on Photoshop. I cropped it to 100 x 150 pixels to match the actual document's size and resolution. I added a new layer above the photo's layer and I picked the colour of my skin by using the "Eyedropper Tool" and began tracing my face over the photo by using the "Pencil Tool" with 1 pixel-size option (but in some cases I changed the size to somewhere around 4-10, because it makes me easier to fill big parts). I traced the face by following its shape... After I got its shape, then I added the other things. Such as the mouth, teeth, eyes, eyebrows and nose. For this section I worked on separate layers, so each part have their own layers and I also worked under the photo's layer (before, I was working over the photo's layer) and just turned the "Visibility" On and Off to see what was going on. And basically, all I did was just trace the parts of the photo that I want.... For the glasses and the hair I just drew what they supposed to look because if I had to trace them, it wouldn't look nice because those parts in the photo were kinda dark and pixelated. Anyway, I picked the proper colours by using the "Eyedropper Tool" again, and drew them by using the "Pencil Tool" with 1 to 4 or 6 pixel-size option. For the glasses' lens I turned the opacity down to somewhere around 37 (by right-clicking the glasses' lens layer and then click the Blending Option... and turn the Opacity down). Because, it helps the glasses look realistic. For the last step, I just tweaked everything and added some highlights or details to each parts/corners to help them look like "8 bit" or "Pixelated". Like in the old video game, like Super Mario Bros. Anyway, thank you and sorry for mistakes.


Friday, 31 January 2014

(*) Year Two!

Welcome Back! Now we're on Year Two. So, from now on...there will be many new things and probably more new assignments too. So... See you soon on the next post!

Credit for the picture:
http://www.layers-of-learning.com/wp-content/uploads/2012/02/Year-Two-banner.jpg
- http://www.layers-of-learning.com/homeschool-curriculum-catalog/

Friday, 24 January 2014

(✎) (✉) Digital Surrealism Assignment

"Power Savings"
    
      Hello, this is my result for the Digital Surrealism Assignment. My concept for this image is about “Power Savings”. I chose "Power Savings" as my concept because in my perspective power savings are also part of our life that we should do. It will save the environment, money, and also our body that needs more fresh air. My intended message for this image is to show everybody how it will be and look like, if we keep continuing the habit of power savings.

       In the image, there are several objects that I used to make symbolisms. For the first one, is the “Standing Fan”. I chose a Fan to be a symbolism of an electricity object that people often use when the weather is hot. I chose it because, I would like to show the audience, how "Fans" could reduce electricity if they use them on unnecessary situation or let them plugged on for a long time. And they are might even could contaminate the air if they don't clean them (But, for overall it is a good thing). In the image, if you notice I plugged the Fan's wire/cable to the Sun. I plugged it to the sun because, rather than I plugged it to the Electricity Generator, I would rather plugged it to the Sun that would likely more represent a Power Savings. And I also drew some blowing leaves over the person to represents the air's freshness because of the power savings. For the second one, is the Person. I chose a person to represents the feeling of freshness, which is by using his body's posture that looks like he is just got a freedom or happy or etc. For the third one, is the Electricity Generator. I used an Electricity Generator to represents the Electricity Source which we always use. In the image I made the Electricity Generator burned, it is because I want to show everybody that instead of using the actual electricity, we would rather use the natural electricity that is more better and saver. And the last one is the Sun. The Sun is definitely represents the source of all the power savings. In the image, there are two types of power sources. The Generator and The Sun. If you notice, I decided to burned the Generator and put it on a “cage” made of grass or something like that. It is because, I want to remind the audience that the Sun's power is much better to use as a source of electricity instead of using the Generator's power as a source of electricity. The Sun's power is more saver, better, and good for the environment.

       The procedure of this image is all started by brainstorming. My first theme of this project is actually about “Strength”. I used to choose “Strength” as my theme because I was really inspired by Football players, I wanted to show the audience about how strong Football players are. On my very first sketch, I was going going to create an image that has a Football player and a lion. The purpose was to illustrate a Football player that tackles a lion or going through a lion. Why?... Because both the lion and and the player, usually have the same traits, like aggressive, brave, and etc. So, I wanted to illustrate if a football player could go through a big and ferocious lion. Anyway, because it was kinda hard for me to gather the images so I decided to cancel the theme. After that, I started to think another theme. But because of I ran out of time to think about a new theme. So, I asked my dad for a suggestion for my project's theme. And he came up with an idea about power savings and he drew a sketch. After I heard and see the sketch, I was impressed so I decided to pick that theme. Later on, I developed the sketch and change things a bit. I redraw the sketches, and I began to take pictures. I took a picture of myself facing a standing fan in my bedroom. I actually had a lot of pictures of it but I chose the best one. Anyway, after that I searched some images on the web (which is on Flickr) to support my theme. I downloaded a several photos of landscape, trees, bushes, a fire, a case or cupboard(that will later on transform to be an Electricity Generator) and a car's battery(it is inside the Electricity Generator). After all the images gathered and open on Photoshop, I started to create my projects step by step.
First of all, I began with opening a new document with the proper size. I opened the photo that I took, and started to select some parts that need to be moved to the actual project's document. I selected the parts by using the selections tool, like Magic Wand, Lasso Tool, and mostly I used the Quick Selections Tool. I selected myself and the fan and moved them to the actual document by using the Move Tool and then I resized them(by the way, in my first sketch I actually moved them with the background which is the bedroom, so all together. But I decided to not do it, because it looked weird). After that, I opened the background image. Before I moved it, I split the image into two parts which is the sky and the landscape. I split them by using the Quick Selection and used the Refine Edge... to make the edges smoother. Then I moved them to the project's document and resized them. And I opened the other pictures that have the trees and the bushes. I selected the parts that I want to moved, used Refine Edge... and moved them and resized them. Basically all the first steps are the same things. After all gathered, I added the light source which is a Sun. I added the Sun by using a Lens Flare Filter. Which is by going to the Filter-Render-Lens Flare. And then, I actually added a Circle Shape on it, to supports the shape of a sun. And I used the Outer and Inner Glow(which is by right-clicking on the layer and click the Blending Option.. and tick the Outer Glow and Inner Glow options) to makes it more realistic. For the second steps, I started to tweak everything one by one. Like, the colours, exposure, quality, brightness, contrast, and etc. I mostly did them by using the Adjustment Layers which is by going to the Layer-New Adjustment Layer. The third steps, I began to add extra things. Like the Generator, the fan's wire/cable, the shadows, grass cage and the blowing leaves. For the Generator, I used the Adjustment Layers for tweaking the Exposure and the Hue/Saturation to makes it look like it has been heated. And then I added the fire on the top of it. And to makes it more realistic I drew around the area of it by using the Brush Tool and picked the colour of red orange and tweaked the opacity of the Brush to make it clear. For the fan's wire/cable, I just drew it by using the Brush Tool that usually located on the sidebar. And picked a colour of grey to matches the fan. And used the Bevel & Emboss effects (which is by right-clicking the layer and click the Blending Option... and tick the Bevel & Emboss option) to make it more realistic, because before it was just a “Brush” line. For the shadows, I mostly did them by using the Brush Tool. Because it was kinda more easier and save more time. Anyway, I picked the colour of black and started draw the lines step by step by following where the light source is facing. And then, I right-clicked on each of them go to the Blending Option... and set the Blend Mode to Soft Light (and actually a few of them are normal, just a few.) and tweaked the opacity to creates the actual shadows effects. For the grass cage and the blowing leaves, they were pretty simple. I just used the Brush Tool and changed the “Brush” to “Grass/Leaves Brush” which is by going to the top of the bar and there many brushes to look up. Anyway, I chose the “Leaves/Grass Brush” and pick a colour of dark green/light green. And I just drew it on the place where I want to. And for the blowing leaves, I used the Outer Glow effects to makes it more interesting. And The fourth step was about tweaking. I tweaked everything again to make sure that things are on the right way. For the fifth step, because I felt like there was still something. I realized that I was missing blurs. So, I added blurs to every layers/places to make them look more realistic. I added the blurs by going to the Filter-Blurs-Gaussian Blurs. And the last step was for organizing and cleaning things.

      Anyway, I have been learning so much things while doing this project. I have learned what Surrealism is, I have learned how to properly combining pictures together, adding effects, manipulating photos, playing with the lights and hues, balancing elements and etc. For overall, I am satisfied with my end result even though in my thought that it needs more tweaking but I am still satisfied about what I have done. I wish I could do more of these. Because sometimes, I feel like I am inspired about this project. And anyway, thank you very much. Sorry for typos and mistakes :)

Thursday, 19 December 2013

(✎) (✉) Stop Motion Film Project

      Hello. This is our Stop Motion film project. we did this in a group. Our group's name is SKH STUDIO.
Sorry, the picture below is supposed to be a video. But I didn't have time to upload it, so you may watch it on one of our group member's blog.

Story/Plot: 
A story of a fanatic sport fan that is very loyal to his favorite team. Which is Maple Leafs team. Until one day, Maple Leafs has an away a game facing their rival. The Canadiens.Because of his loyalty. He still doesn't want to miss the game. Even though it is his and their rival. He is not scared to go to the stadium, because sometimes there will be Maple Leafs fans too. But when he arrived in The Canadiens' stadium. He got surprised by something that is unusual.... What is that?? what will happen? is he getting something good or bad??? or what??
Find the film here: Loyalty Of The Fans
By: SKH STUDIO
Members/Crews: Jimmy
                                Kadryn
                                UrangSunda

(✎) Photoshop Practice Assignment

Hello. This post is about our Photoshop Practice assignment. Our job is to blend two images on one.
and here we go:

Footfal Upeman


1. First of all, you need two different images to create this.
2. Open both images that you downloaded/had, in Photoshop.
3. After they both opened, Drag and drop one of them to the other image. Which is by using the Move Tool, click and hold the image, and try to move it to the other tab, and then just release it above the image.
3.1. Remember, you must work on the background layer. Unlock the layer by dragging the "lock" symbol into the "trash can" at the bottom
5. After that, click the Quick Selection Tool. And then just select the area that you want to blend.
6. After you finished selecting, go to the top bar and click Refine Edge...
7. And, just play around with the pop up menu. After done, check the Decontaminate Colours.
8. And then, that is it.


Practice source: How To Get Started With Photoshop